
A video can be worth a thousand words. Thanks to Richard Quick, W4RQ for providing this video!
The ONLY control functionality provided by Wi-Fi Radio Control is to synchronize the center frequency setting with that of a WiFi-attached radio receiver. This causes the spectrum displayed by iSDR to track along with the center frequency displayed by both iSDR and the radio. Other settings, such as mode and AGC, are not synchronized between iSDR and the radio. By having only the frequency synchronized allows iSDR to function more like an auxiliary receiver, allowing you to use iSDR to apply different filters, modes, AGC, etc. as iSDR is tuned to adjacent signals, without affecting the radio’s settings.
When used as part of a complete system this feature allows an iPad, iPhone or iPod touch device running iSDR to control the frequency setting of the radio using touch gestures on the Apple device’s display. This causes the spectrum displayed by iSDR to track the center frequency setting, providing a compelling touch-controlled SDR radio receiver interface covering the entire spectrum that the radio can receive.
Wi-Fi Radio Control within iSDR does not transport audio via Wi-Fi, and there are currently no compatible Wi-Fi radio-interface devices supporting audio transport. So neither microphone audio, nor speaker audio is handled via Wi-Fi using this setup, and it is necessary to connect a wire carrying the I/Q signals from the radio to a stereo microphone adapter on the iPad. See our iSDR Blog for information on how to connect I/Q audio to your Apple device.
How It Works
With this feature enabled, touches applied to the display of iSDR can affect not only the frequency that iSDR displays, but can also cause frequency-setting commands to be sent (via Wi-Fi) from your iOS device to a paired receiver. This will cause the receiver’s frequency setting, and the center frequency of its I/Q output signals, to track right along with iSDR. If iSDR is displaying the spectrum derived from the receiver’s I/Q (or IF) then you will be able to quickly and easily tune across the entire spectrum covered by the receiver, and view any 44 kHz segment of that spectrum, with a few touch gestures.
Three hardware components are required in order to make use of the Wi-Fi Radio Control feature:
Radio – a radio capable of being controlled with standard serial digital “CAT” commands (see list of tested equipment)
Wi-Fi Radio Interface – a Wi-Fi (TCP) -to- serial (RS-232) adapter (see list of tested equipment)
iPhone, iPad, or iPod touch – Must be running iOS 5.1.1 or later
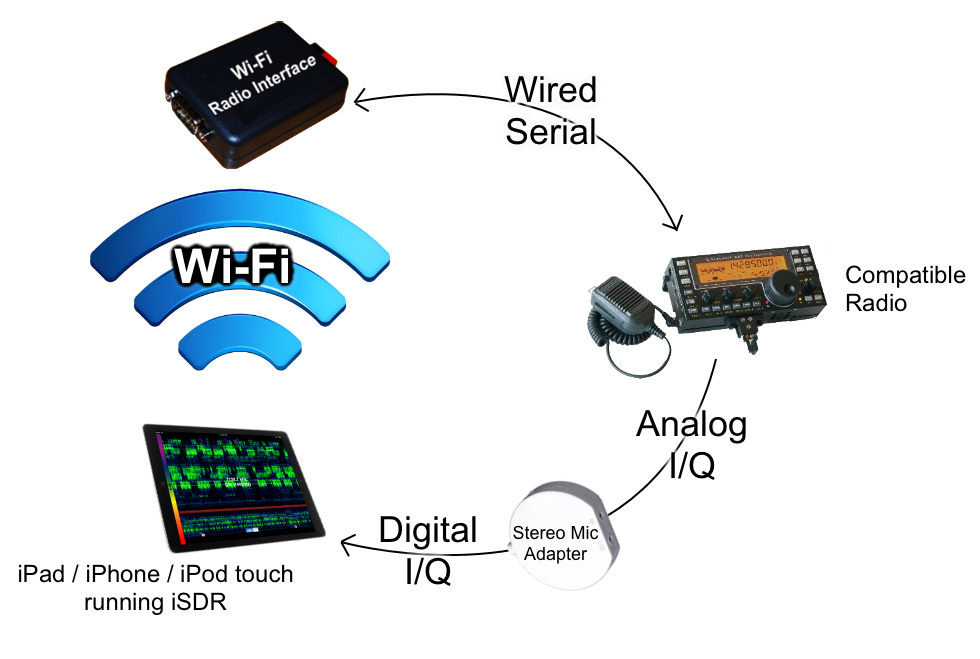
The setup for using this feature with a radio providing access to its buffered I/Q signals is shown in the simplified diagram below:
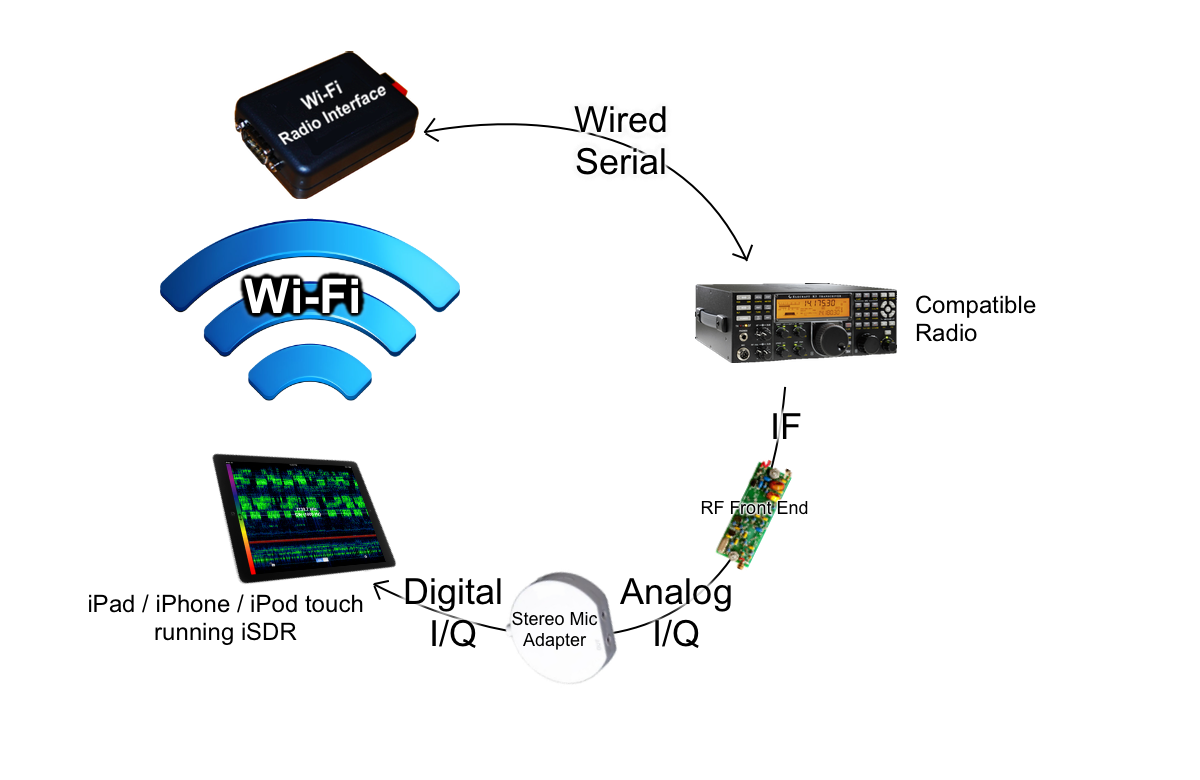
The setup for using IF from the radio is similar:
Feature Installation
First, purchase and download iSDR from the App Store, or update to the latest app version, if you have not done so already.
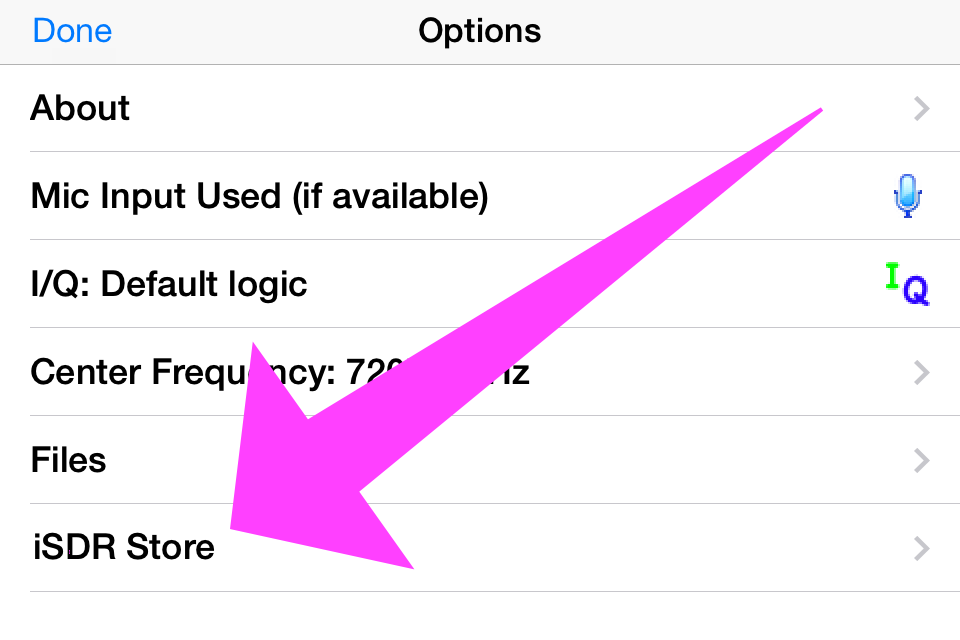
Wi-Fi Radio Control is installed and enabled immediately after you purchase that feature within the iSDR Store. You will find the feature offered in the iSDR Store within the Options menu of the app. Your Apple device must be connected to the Internet (Wi-Fi or cellular) in order to purchase the feature. Here are the steps:
Access the Menu
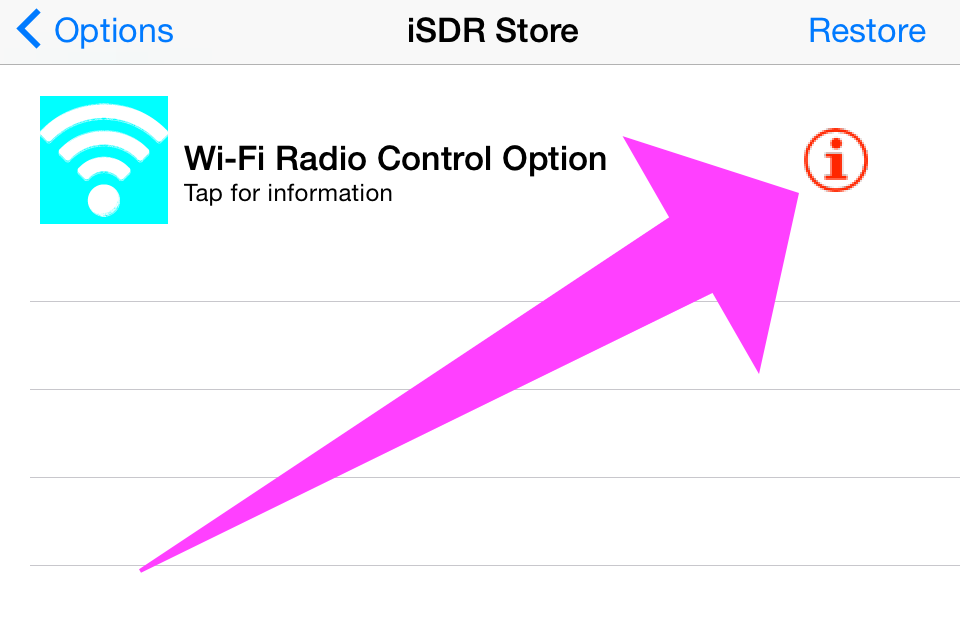
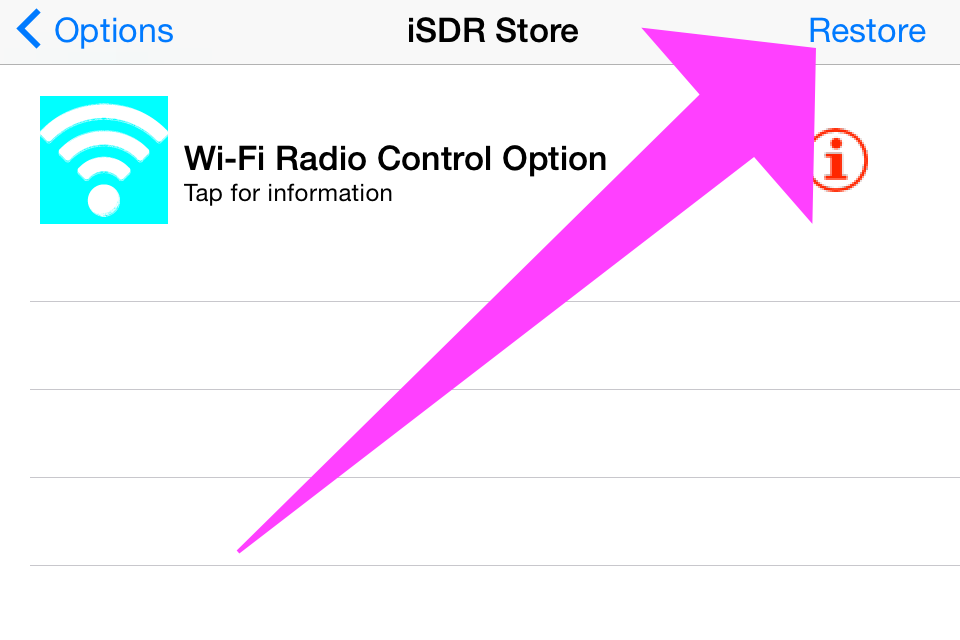
Open The Store
Expand Item
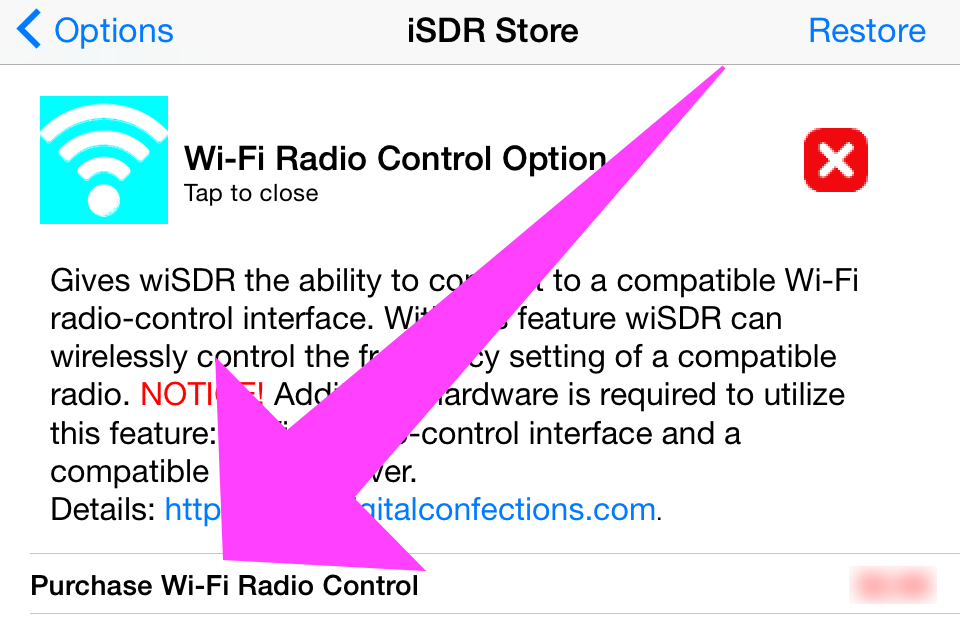
Select Purchase
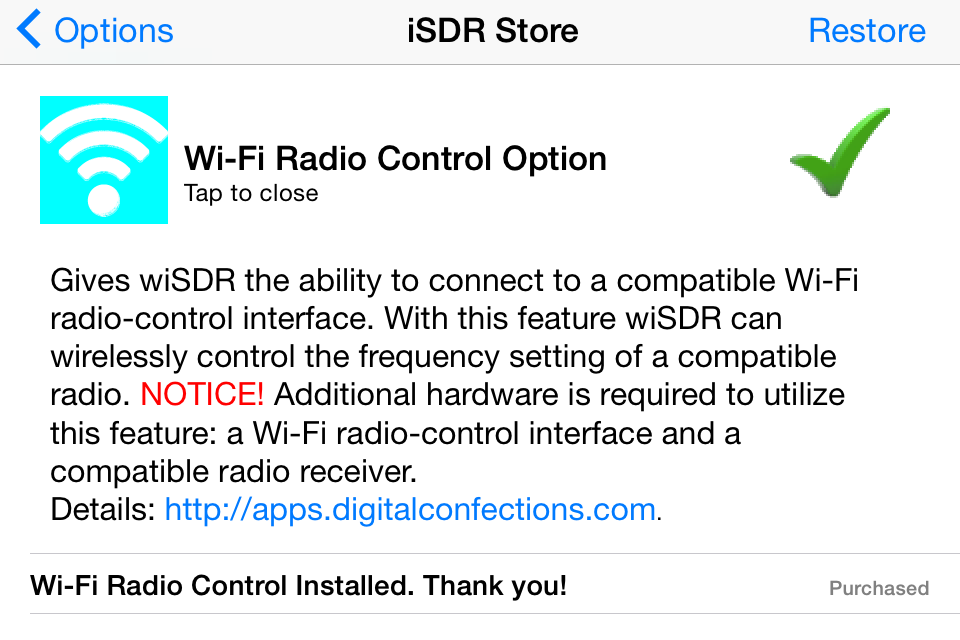
Success!
Restore
If you ever delete iSDR and wish to re-install it, or if you decide to install iSDR on another iOS device, you will need to re-enable the Wi-Fi Radio Control feature using the restore button. Attempting to repurchase an item also works: you’ll be allowed to install the feature again without being charged. Either way you’ll pay only once per Apple ID.
Configuring Wi-Fi
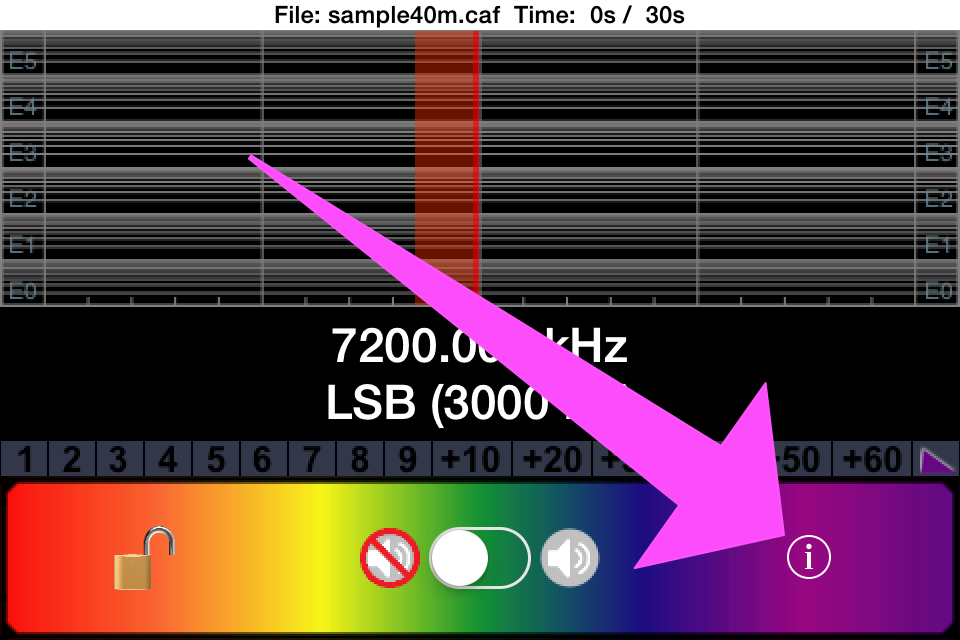
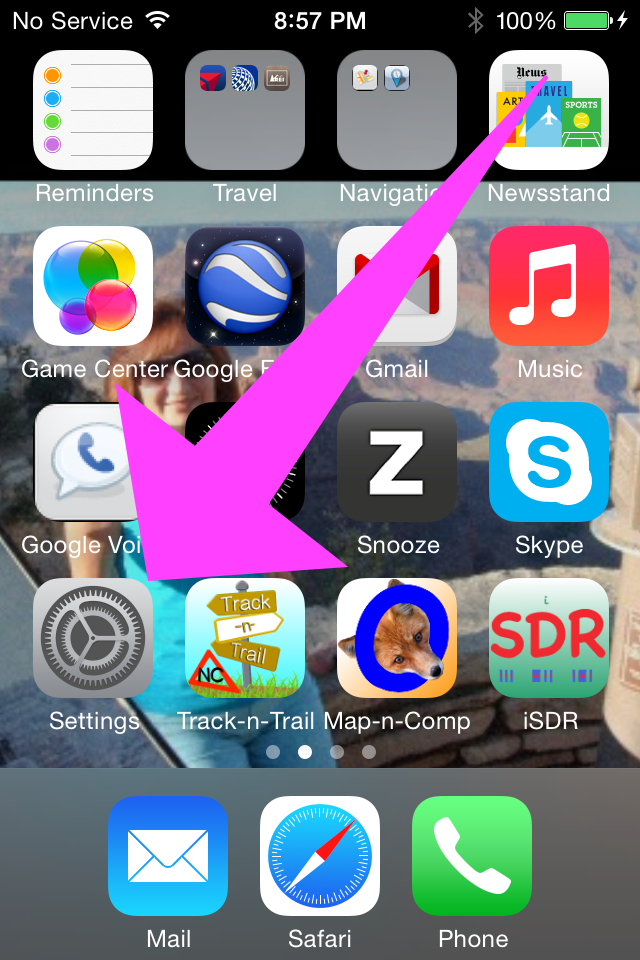
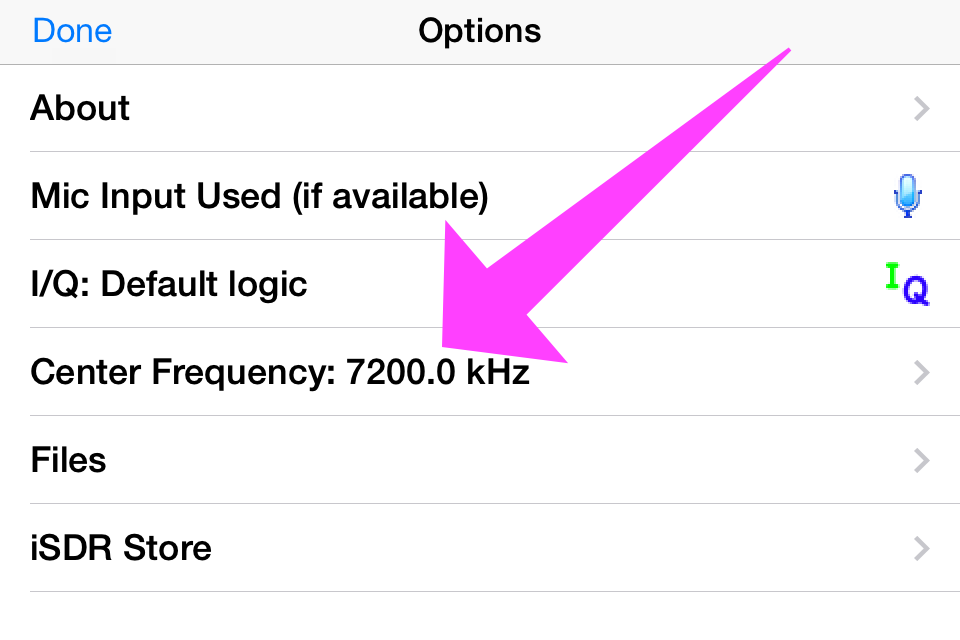
In order to establish a TCP connection using Wi-Fi it is necessary to set the IP address and port setting to agree with those of your Wi-Fi Radio Interface device. The IP address and Command Port can be changed within the app, but some settings and certain app preferences are accessible only within native Settings. Access native Settings from the main screen:
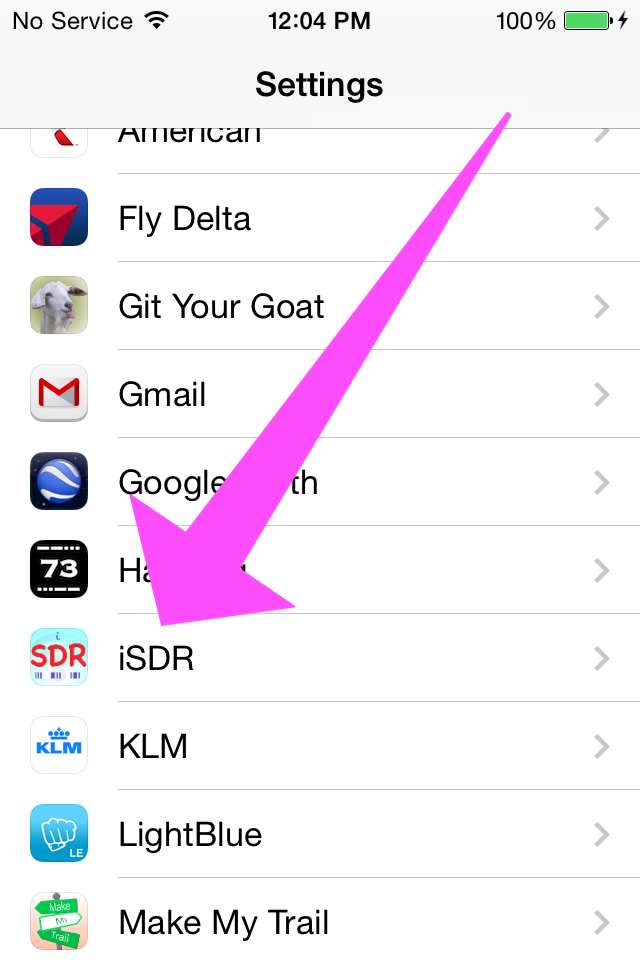
After opening native Settings scroll to the bottom and locate and select the iSDR app native settings:
Scroll to the bottom of the iSDR native Settings to make adjustments affecting Wi-Fi:
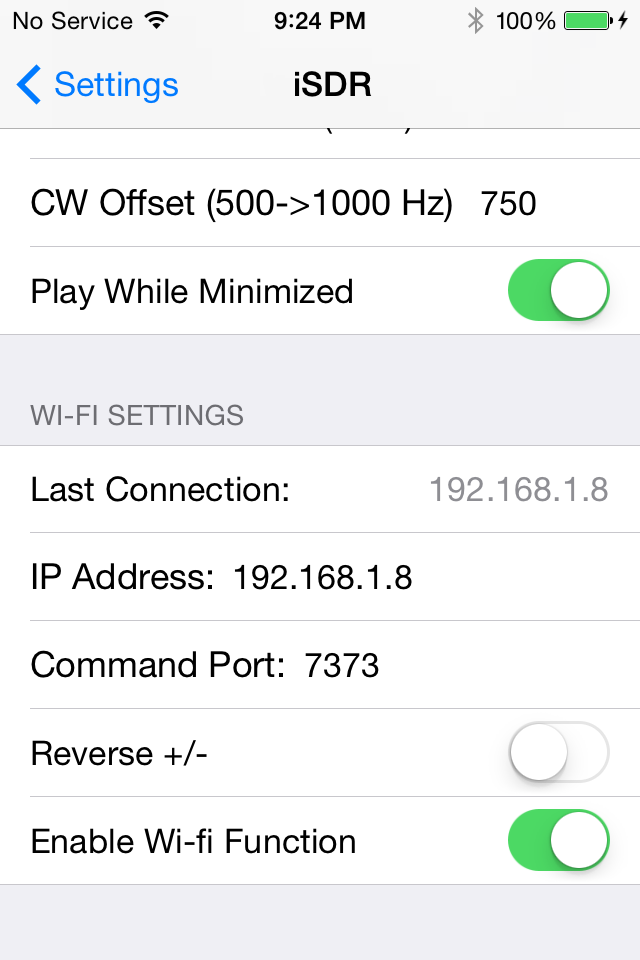
For your convenience the IP address of the last Wi-Fi Radio Interface TCP connection is displayed just above the IP Address setting.
Command Port corresponds to the local TCP listener port of the Wi-Fi Radio Interface device.
Reverse +/- will swap the screen locations of the plus/minus keys for left-handers.
Enable Wi-Fi Function allows you to switch the operation of iSDR between plain vanilla iSDR and Wi-Fi enabled iSDR; this key has no effect if the Wi-Fi feature has not been purchased.
Starting Wi-Fi Radio Control
Make sure that your Wi-Fi Radio Interface device is powered on and operating as an access point, or that it is connected to your local Wi-Fi network. If your Wi-Fi Radio Interface device is operating as an access point then make sure that your Apple device is Wi-Fi-connected directly to the Wi-Fi Radio Interface (this is accomplished in native Settings, not in iSDR). If, instead, your Wi-Fi Radio Interface device is connected as a member of your local Wi-Fi network then make sure that your Apple device is connected to the same Wi-Fi router shared by the Wi-Fi Radio Interface. If you need detailed instructions for accomplishing any of those steps, please refer to the documentation provided by the manufacturer of your Wi-Fi Radio Interface.
Now is a good time to make sure that your radio’s serial communication port is properly connected to the Wi-Fi Radio Interface and that your radio is powered on and configured correctly. If you need detailed instructions for accomplishing those steps, please refer to the documentation provided by the manufacturer of your radio.
Ensure that the I/Q output for your radio is connected properly to your Apple device. See our iSDR Blog for information on how to connect I/Q audio to iSDR. You can easily test the I/Q connection by operating the radio and starting iSDR on your Apple device: with “Mic Input Used (if available)” set in the iSDR menu, and the audio on/off switch set to “ON” you should be able to receive live I/Q signals directly from the radio with or without the Wi-Fi Radio Control feature enabled.
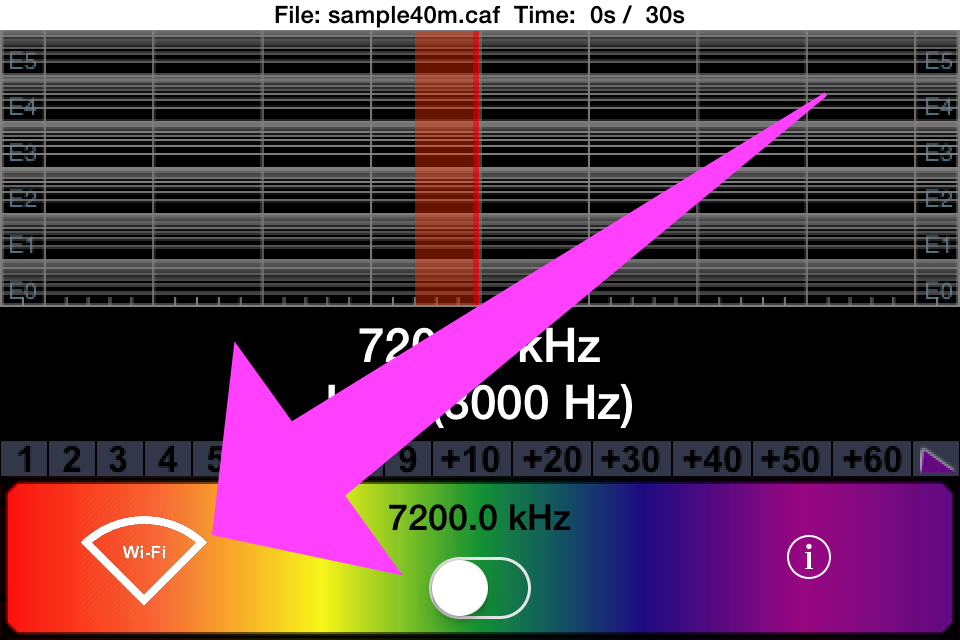
When the Wi-Fi Radio Control feature is enabled the iSDR “lock” button is replaced by the Wi-Fi button as shown below. Tap the Wi-Fi button to initiate a connection with the Wi-Fi Radio Interface.
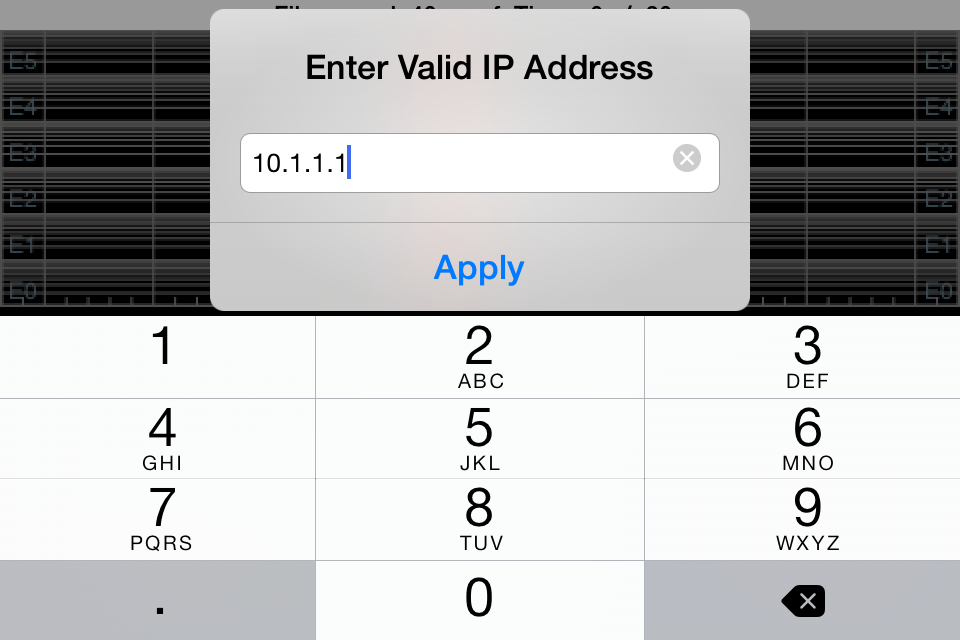
If you have not yet entered a valid IP address for the Wi-Fi Radio Interface device then iSDR will prompt you for the IP address to use:
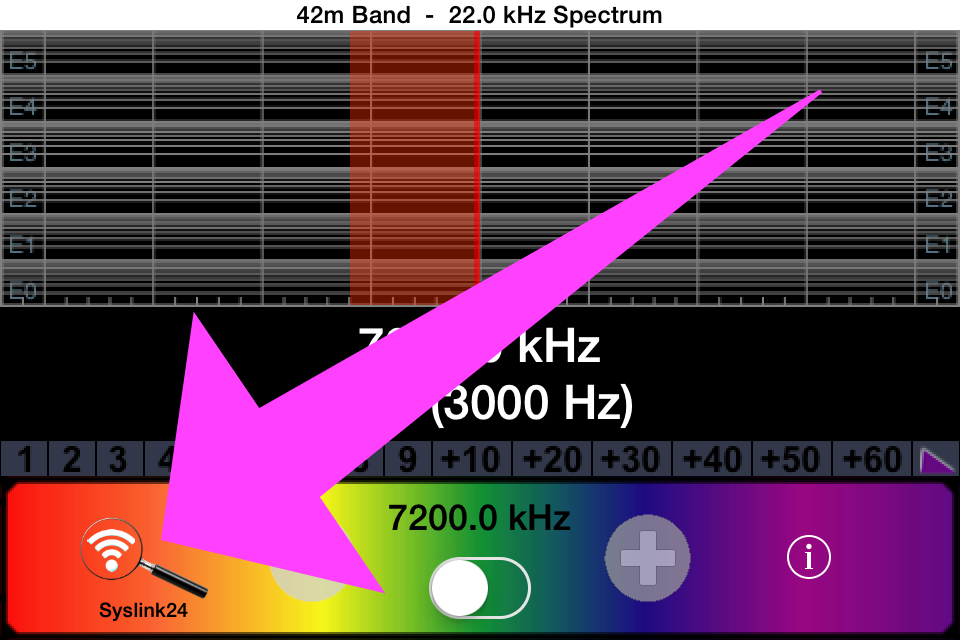
Once you have entered a valid IP address iSDR will automatically attempt to establish a connection with the device at that address and the Command Port setting specified in native Settings. You should never need to enter the IP address again unless it changes (e.g., the Wi-Fi Radio Interface is reconfigured or replaced). The Wi-Fi button will display the magnifying glass image while it attempts to establish a TCP connection with the Wi-Fi Radio Interface. The SSID of any currently connected device (e.g., your Wi-Fi router) is shown just below the Wi-Fi button.
When iSDR successfully establishes a TCP data connection with the Wi-Fi Radio Interface the Wi-Fi button appears as shown below. You can tap on the Wi-Fi button if you wish to disconnect. While connected any touch actions affecting the center frequency will cause the radio’s frequency to follow along.
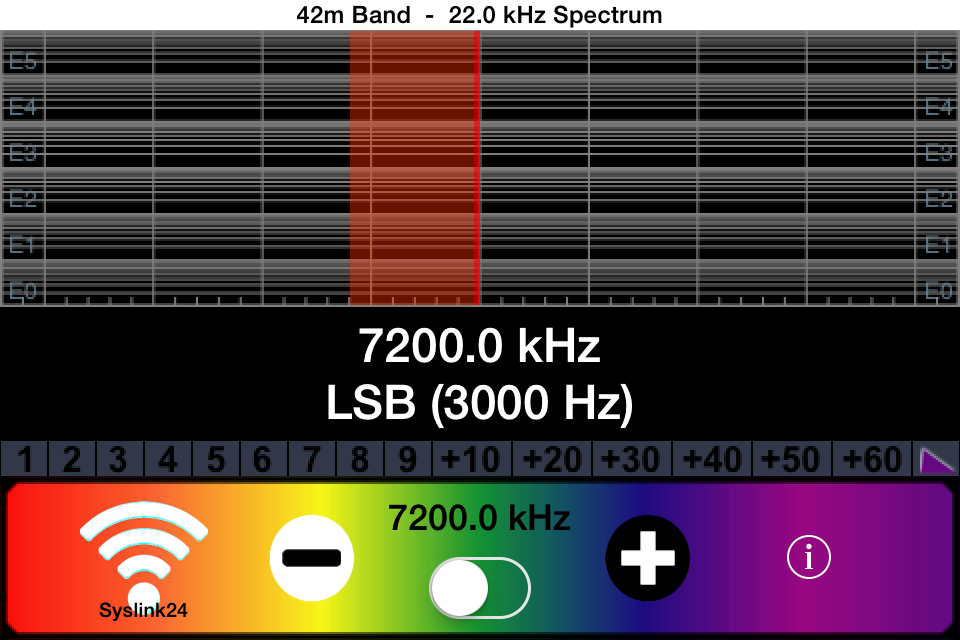
If the radio you are using recognizes the configuration command that iSDR sends to it, the radio will be configured to send frequency changes made at its front panel to iSDR. The app will indicate that your radio has acknowledged the configuration command by changing the Wi-Fi button from white to green as shown below. You will then notice that the center frequency can be adjusted by making changes at either the radio or in iSDR.
Using Wi-Fi Radio Control
Once iSDR is connected to your radio and Wi-Fi Radio Interface, iSDR’s main display on/off switch behaves differently. It now has three settings: OFF, Normal and Centered. Tapping the switch causes it to cycle sequentially through each setting.
Off means just that: no audio is heard, but the plus/minus keys and menu settings will still affect the radio’s frequency setting. The other two modes are described below.
Normal Tuning Mode
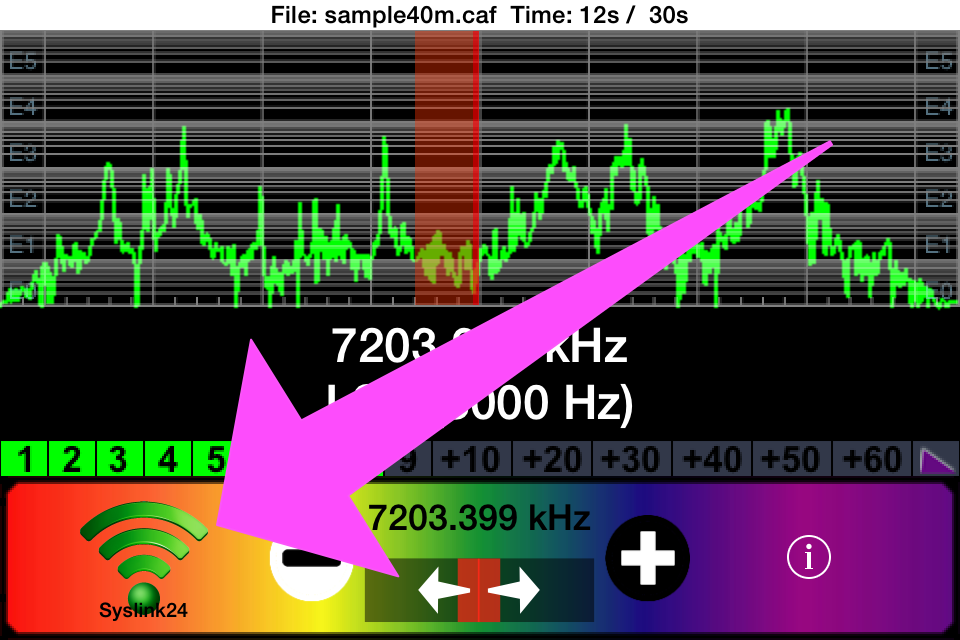
Normal Wi-Fi tuning mode is indicated by the switch symbol shown below. The current center frequency setting is displayed just above the switch.
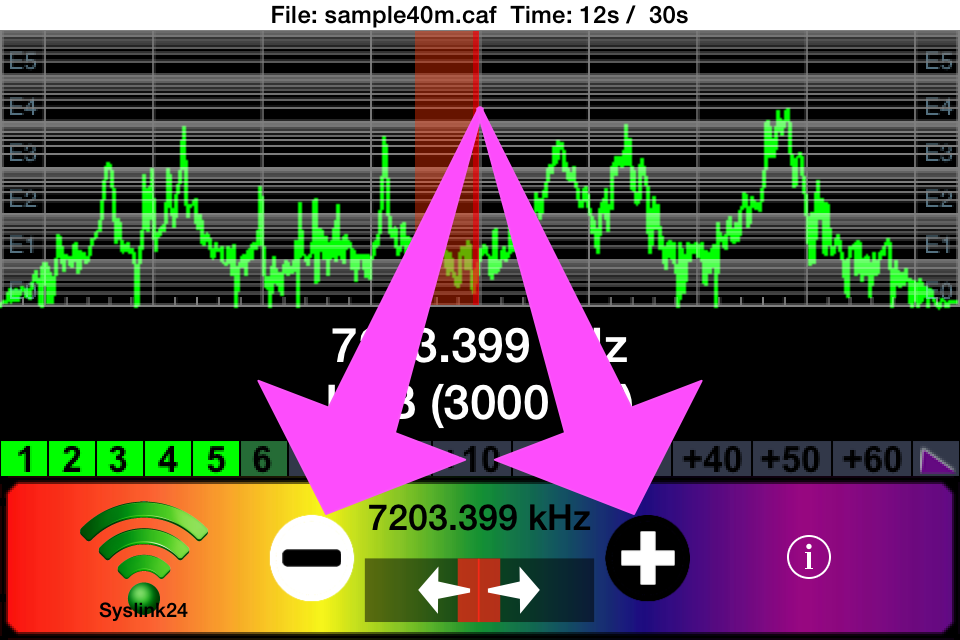
In Normal Wi-Fi tuning mode the center frequency can be set using the plus/minus keys to the left and right of the switch.
Selecting specific signals is accomplished by touching the spectrum region shown on the display, or by sliding a touch along the rainbow tune bar – just as iSDR has always worked. The center frequency can always be set to a specific value using the menu: this is true for both Normal and Centered tuning mode settings, or even when the iSDR display switch is OFF.
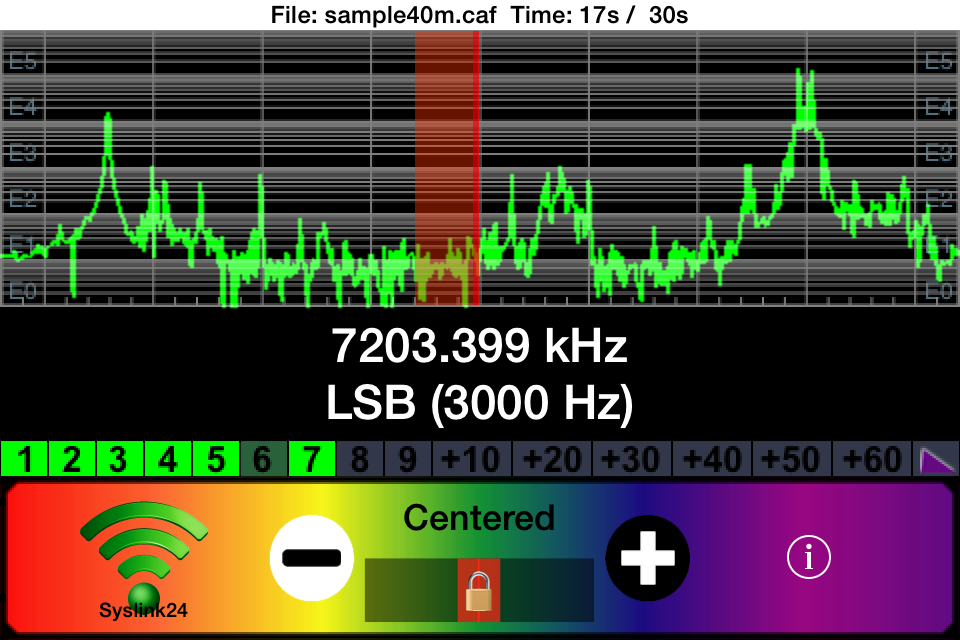
Centered Tuning Mode
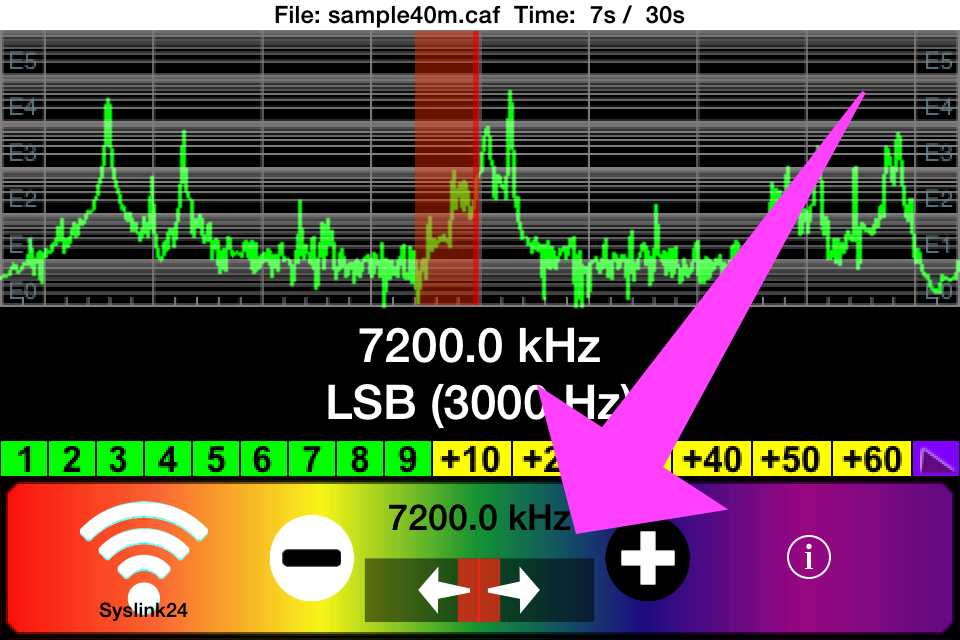
Centered Wi-Fi tuning mode is indicated by the switch symbol shown below. In this mode the cursor always remains at the center of the spectrum display, and the current center frequency setting is indicated in the frequency/mode window near the center of the display.
In Centered tuning mode the center frequency can be set using the plus/minus keys to the left and right of the switch, by swiping along the rainbow tune bar, by swiping along the spectrum display, or with a single tap on the spectrum display.
Tested Compatible Equipment
The following combinations of equipment have been tested with iSDR’s Wi-Fi Radio Control feature and were found to work. If you are interested in using Wi-Fi Radio Control with devices that do not appear on this list of tested compatible equipment, then please Contact Us.
If you give this feature a try please let us know what you think using our Contact Us page. We would love to receive your impressions and suggestions. If you are interested in using Wi-Fi Radio Control with devices that do not appear on this list of tested compatible equipment, then please Contact Us.
Equipment Sources